Prep Time: 15 minutes | Cook Time: 1 hour | Total Time: 1 hour 15 minutes | Serves: 6-8 | Difficulty: Easy
Table of Contents
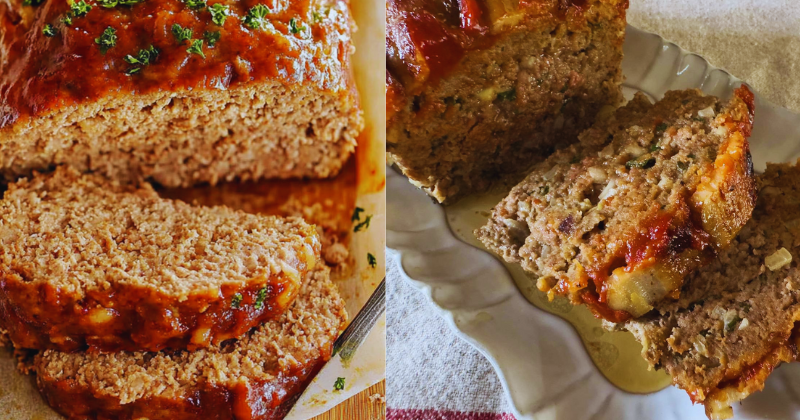
I’ll never forget the first time I attempted my grandmother’s classic meatloaf recipe. Standing in her cozy kitchen at age twelve, I watched her mix ground beef with breadcrumbs and eggs using nothing but her weathered hands and decades of intuition. “The secret,” she whispered conspiratorially, “is treating it like you’re tucking a baby into bed – gentle but secure.” That wisdom has guided every meatloaf I’ve made since, and today I’m sharing this foolproof classic meatloaf recipe that transforms simple ingredients into pure comfort food magic. Whether you’re feeding a hungry family on a weeknight or craving that nostalgic taste of home, this traditional meatloaf delivers every single time.
Why You’ll Love This Classic Meatloaf Recipe
This isn’t just another meatloaf recipe – it’s your ticket to becoming the family hero at dinner time. First, it’s incredibly easy and beginner-friendly, requiring no special equipment or advanced cooking techniques. You’ll have everything mixed and in the oven within 15 minutes. Second, this recipe is budget-friendly without sacrificing flavor. Using affordable ground beef and pantry staples, you can feed a family of six for under $15. Third, it’s naturally family-friendly with mild, comforting flavors that even picky eaters embrace. Fourth, this homemade meatloaf stays moist and tender thanks to the perfect ratio of meat to binding ingredients, solving the age-old problem of dry, crumbly results. Finally, it’s a make-ahead champion – you can assemble it in the morning and bake it when you get home, or freeze it for up to three months. This recipe consistently delivers that perfect slice that holds together beautifully while remaining incredibly tender.
Ingredient Insights & Smart Selection Tips
The beauty of classic meatloaf lies in its simple ingredient list, but choosing quality components makes all the difference. Ground beef with 80/20 fat content is your sweet spot – enough fat for flavor and moisture without being greasy. Avoid anything leaner than 85/15, as it will result in a dry, tough texture. Fresh breadcrumbs trump store-bought every time; simply pulse day-old bread in your food processor for superior texture and flavor absorption. Large eggs act as the crucial binding agent, while whole milk adds richness and helps create that tender crumb. For the aromatic base, yellow onions provide the best balance of sweetness and savory depth when sautéed until translucent. Worcestershire sauce adds umami complexity that elevates the entire dish. When selecting ingredients, choose organic eggs and grass-fed beef when possible for enhanced flavor. Store ground beef in the coldest part of your refrigerator and use within two days of purchase. If you need gluten-free options, substitute breadcrumbs with crushed gluten-free crackers or oats. Dairy-free alternatives include using unsweetened almond milk instead of regular milk.
Essential Techniques & Method Overview
Mastering classic meatloaf requires understanding four key techniques that separate amateur attempts from restaurant-quality results. Proper mixing technique is paramount – combine ingredients using a light touch, mixing just until everything is evenly distributed. Overmixing develops the proteins too much, resulting in a dense, tough texture that’s more suited for meatballs than tender meatloaf. Temperature control throughout the process ensures even cooking. Your oven should be preheated to exactly 350°F, and using a meat thermometer eliminates guesswork – you’re aiming for an internal temperature of 160°F. Moisture management involves creating the perfect balance of wet and dry ingredients. The mixture should hold together when squeezed but not feel wet or sticky. Strategic shaping means free-forming your loaf on a rimmed baking sheet rather than using a loaf pan, which allows air circulation and prevents the bottom from becoming soggy. The ideal dimensions are roughly 9 inches long, 5 inches wide, and 3 inches high. Resting technique after baking allows juices to redistribute throughout the meat, preventing them from running out when you slice. These techniques work together to create that perfect balance of structure and tenderness that defines exceptional meatloaf.

Step-by-Step Instructions for Perfect Results
1. Prepare your workspace by preheating your oven to 350°F and lining a rimmed baking sheet with parchment paper. This prevents sticking and makes cleanup effortless.
2. Create the aromatic base by heating 1 tablespoon of olive oil in a skillet over medium heat. Sauté 1 diced medium onion until translucent and fragrant, about 5-6 minutes. You’ll hear the sizzling subside as moisture evaporates, and the onions will turn golden at the edges. Set aside to cool completely.
3. Mix the binding mixture in a large bowl by whisking together 2 large eggs, ½ cup whole milk, and 2 tablespoons Worcestershire sauce until well combined. The mixture should be smooth and pale yellow.
4. Combine dry ingredients by adding 1 cup fresh breadcrumbs, 1 teaspoon salt, ½ teaspoon black pepper, and 1 teaspoon dried thyme to the wet mixture. Stir until the breadcrumbs are completely moistened.
5. Add the meat by gently breaking 2 pounds of ground beef into chunks over the breadcrumb mixture. Add the cooled sautéed onions and use your hands to mix everything together with a light folding motion. The mixture should just come together – stop as soon as you don’t see any dry breadcrumbs.
6. Shape the loaf by transferring the mixture to your prepared baking sheet. Gently shape it into a loaf, smoothing the surface with damp hands. The loaf should hold its shape but not look compacted.
7. Bake until perfect for 45-55 minutes, or until the internal temperature reaches 160°F. The exterior should be golden brown and the top should feel firm to gentle pressure.
8. Rest before slicing by letting the meatloaf sit for 10 minutes after removing from the oven. This crucial step prevents the juices from running out when you cut into it.
Pro Tips & Troubleshooting for Guaranteed Success
Temperature is everything – invest in a reliable instant-read thermometer and insert it into the center of the loaf at the thickest point. This eliminates guesswork and prevents overcooking. The panade technique (the breadcrumb and milk mixture) should sit for 5 minutes before adding meat, allowing the breadcrumbs to fully hydrate for optimal texture. Test your seasoning by cooking a small portion of the mixture in a skillet before shaping the loaf – this allows you to adjust salt and pepper without waste. Prevent cracking by avoiding temperature shock; let the shaped loaf sit at room temperature for 15 minutes before baking. Fix a too-wet mixture by adding more breadcrumbs gradually, while a too-dry mixture benefits from an extra egg or splash of milk. Create a gorgeous glaze by brushing the top with a mixture of ketchup, brown sugar, and apple cider vinegar during the last 15 minutes of baking for a beautiful, caramelized finish.
Creative Variations & Dietary Customizations
Transform your classic meatloaf into exciting variations without losing its comforting essence. Mediterranean style incorporates sun-dried tomatoes, fresh basil, and a touch of oregano, while Mexican-inspired versions feature cumin, chili powder, and diced jalapeños. Gluten-free adaptations work beautifully with almond flour or crushed pork rinds replacing breadcrumbs. Dairy-free versions substitute coconut milk for regular milk without compromising texture. Lower-fat options can use ground turkey or a 50/50 blend of beef and turkey, though you’ll need to add an extra egg for binding. Scaling for different crowds is simple: halve the recipe for 3-4 people or double it for meal prep, adjusting cooking time by 10-15 minutes accordingly. Individual portions can be shaped into muffin tins for faster cooking and perfect portion control.
Storage, Reheating & Make-Ahead Magic
Proper storage extends your meatloaf’s life significantly while maintaining its delicious texture. Refrigerator storage keeps cooked meatloaf fresh for up to 4 days when wrapped tightly in plastic wrap or stored in airtight containers. Freezing guidelines allow you to store cooked meatloaf for up to 3 months – slice it first for easier thawing and reheating. Make-ahead preparation works perfectly; assemble the raw loaf, cover tightly, and refrigerate for up to 24 hours before baking. Reheating techniques vary by preference: oven reheating at 325°F maintains the best texture, while microwave reheating works for quick single servings. Thawing frozen meatloaf requires overnight refrigerator thawing followed by gentle reheating. Always reheat to an internal temperature of 165°F for food safety.
Serving Suggestions & Perfect Pairings
Classic meatloaf shines brightest when paired with traditional comfort food sides that complement its rich, savory profile. Creamy mashed potatoes remain the gold standard pairing, their smooth texture contrasting beautifully with the meatloaf’s hearty consistency. Roasted vegetables like carrots, Brussels sprouts, or green beans add color and nutritional balance. Simple green salads with vinaigrette provide a fresh counterpoint to the dish’s richness. Wine pairings favor medium-bodied reds like Merlot or Pinot Noir, while beer lovers should reach for amber ales or wheat beers. Complete meal planning might include starting with a light soup, serving the meatloaf with two sides, and finishing with a simple dessert like apple crisp. Leftover transformations turn cold meatloaf into incredible sandwiches or can be crumbled into pasta sauce for a quick weeknight dinner.
This classic meatloaf recipe represents more than just a meal – it’s a connection to tradition, a symbol of home, and proof that simple ingredients can create extraordinary comfort. Take your time with each step, trust the process, and don’t forget to make it your own. Your family will thank you, and you’ll have created a new tradition worth passing down. What memories will you create with your classic meatloaf tonight?