
Prep Time: 2 hours (including rise time) | Cook Time: 15 minutes | Total Time: 2 hours 15 minutes | Serves: 6-8 people (about 60 bites) | Difficulty: Intermediate
Table of Contents
The smell of fresh pretzels wafting through a shopping mall food court used to be my ultimate weakness – that irresistible combination of warm, pillowy bread and coarse salt that made my mouth water from three stores away. But it wasn’t until my teenage daughter challenged me to recreate those addictive pretzel bites at home that I discovered just how magical the process could be. Watching her face light up as we pulled the first golden batch from the oven, steam rising from their perfectly chewy centers while salt crystals sparkled on their glossy surfaces, I knew we’d stumbled onto something special. What started as a fun weekend project has become our family’s most requested snack, perfect for game day gatherings, after-school treats, or whenever we crave that authentic pretzel experience without leaving the house. These homemade pretzel bites capture every bit of that mall food court magic while giving you complete control over ingredients and freshness.
Why You’ll Love These Homemade Pretzel Bites
These aren’t just another bread recipe – they’re bite-sized pieces of pure comfort food that deliver restaurant-quality results in your own kitchen. The texture is absolutely perfect with a golden, slightly chewy exterior giving way to an incredibly soft, warm interior that’s light years beyond anything you can buy frozen. They’re surprisingly economical to make at home, costing a fraction of what you’d pay at specialty pretzel shops while yielding enough for a crowd or multiple snacking sessions. The flavor is completely customizable – from classic coarse salt to cinnamon sugar, everything bagel seasoning, or even savory herb blends that transform these bites into gourmet appetizers. Kids absolutely love making them because the hands-on process of rolling dough and dipping in baking soda solution feels like playing with edible playdough, making this an ideal family bonding activity. They freeze beautifully for up to three months, meaning you can always have fresh pretzel bites ready to bake whenever cravings strike. Finally, they’re endlessly versatile – serve them as snacks, appetizers, alongside soups and salads, or even as the base for creative sliders and sandwiches that’ll impress any gathering.
Ingredient Insights & Selection Guide
Creating exceptional homemade pretzel bites starts with understanding how each ingredient contributes to that signature pretzel flavor and texture. Bread flour is essential for achieving the proper chewy texture that defines authentic pretzels – all-purpose flour simply doesn’t develop enough gluten structure to create that perfect bite. If you can’t find bread flour, you can substitute all-purpose flour plus vital wheat gluten, but bread flour delivers superior results.
Active dry yeast provides the lift and flavor development that makes these bites light and airy inside while maintaining structure. Always check your yeast’s expiration date and proof it in warm water (105-110°F) to ensure it’s active – dead yeast means dense, heavy pretzel bites that won’t rise properly. The water temperature is crucial – too hot kills the yeast, too cool prevents proper activation.
Baking soda creates that distinctive pretzel flavor and color through the alkaline bath process that’s essential to authentic pretzel making. Food-grade lye is traditional but requires special handling and safety precautions that make baking soda the safer home choice while still delivering excellent results. Coarse kosher salt or pretzel salt provides the classic finishing touch – table salt is too fine and dissolves too quickly, losing that satisfying crunch.
Butter adds richness to the dough while sugar feeds the yeast and contributes to browning. For dietary modifications, vegan butter works well, and the recipe is naturally dairy-free except for the butter component. Store ingredients in cool, dry places, and always use fresh yeast for best results.
Key Techniques & Method Overview
Mastering pretzel bites requires understanding several specialized techniques that set them apart from regular bread making. Proper dough development involves kneading until the dough is smooth and elastic, typically 8-10 minutes by hand or 5-6 minutes with a stand mixer. The dough should pass the windowpane test – stretch a small piece until it’s thin enough to see through without tearing.
The alkaline bath is absolutely critical for authentic pretzel flavor and appearance. This brief dip in boiling baking soda solution (about 30 seconds per batch) creates the chemical reaction that produces the deep golden color and distinctive taste. Work quickly during this step – have your baking sheets ready and move efficiently to prevent overcooking in the solution.
Temperature control throughout the process ensures consistent results. Dough should rise in a warm, draft-free environment around 75-80°F for optimal yeast activity. The baking soda solution must be actively boiling when you add the pretzel bites, and your oven should be fully preheated to ensure immediate crust formation.
Timing is everything – from the moment you remove bites from the alkaline bath, you have a short window to add salt and get them into the oven before the surface begins to dry out. Proper spacing on baking sheets prevents steaming and ensures even browning on all sides.
Step-by-Step Instructions
1. Prepare the dough (15 minutes + 1 hour rise): In a large bowl, combine 1 packet (2¼ teaspoons) active dry yeast with 1¼ cups warm water (110°F) and 1 tablespoon sugar. Let foam for 5 minutes. Add 4 cups bread flour, 2 tablespoons melted butter, and 2 teaspoons salt. Mix until a shaggy dough forms, then knead on a floured surface for 8-10 minutes until smooth and elastic. Place in oiled bowl, cover, and let rise until doubled, about 1 hour.
2. Shape the pretzel bites (20 minutes): Punch down dough and divide into 8 equal pieces. Roll each piece into a rope about 24 inches long, then cut into 1-inch pieces – you should have about 60 bite-sized pieces. Place on parchment-lined baking sheets, cover lightly with damp towels, and let rest 15 minutes while you prepare the alkaline bath.
3. Prepare alkaline bath and oven (10 minutes): Preheat oven to 425°F. In a large, wide pot, bring 8 cups water and ⅔ cup baking soda to a rolling boil. Line two baking sheets with parchment paper and brush lightly with oil. Have coarse salt ready for immediate sprinkling.
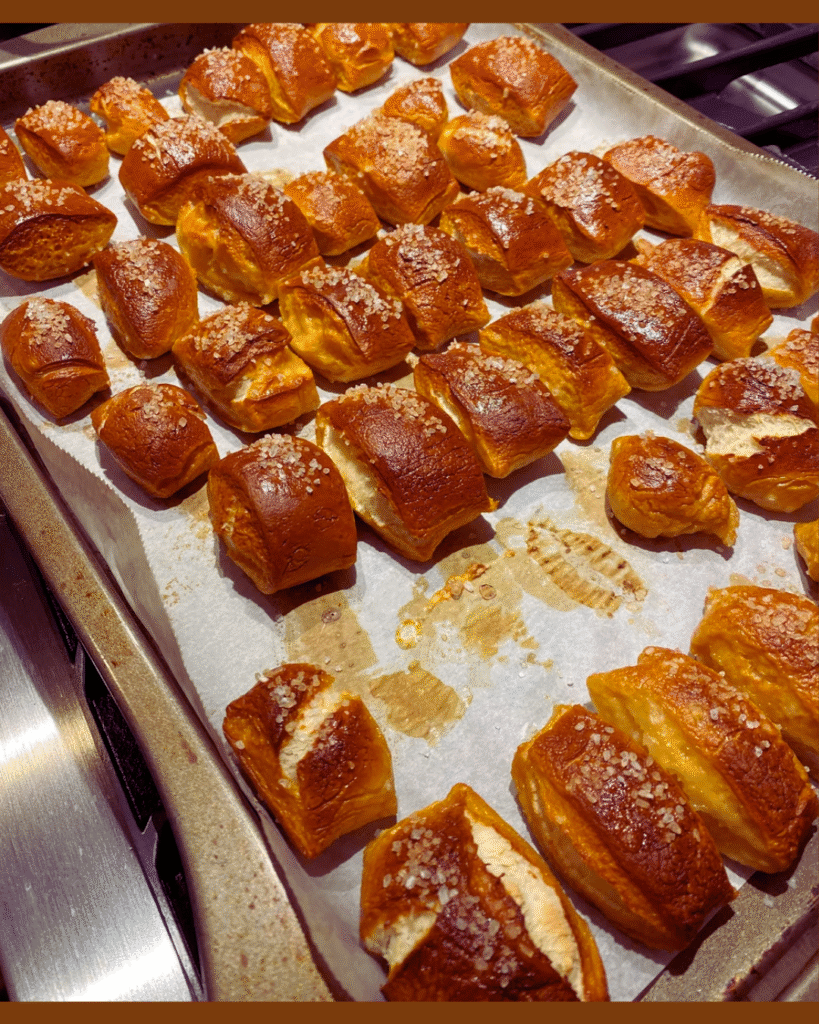
4. Bath and bake the pretzel bites (15 minutes): Working in batches of 10-12 pieces, carefully drop pretzel bites into the boiling baking soda solution using a slotted spoon. Boil for 30 seconds, then immediately remove and place on prepared baking sheets. Sprinkle generously with coarse salt while still wet. Bake for 12-15 minutes until deep golden brown.
5. Cool and serve (5 minutes): Transfer to wire racks and let cool for just 5 minutes before serving – they’re best enjoyed warm when the interior is still steamy and the exterior has that perfect chew. Serve immediately with your favorite dipping sauces.
Pro Tips & Troubleshooting Solutions
Achieve perfect chewiness by not overbaking – pretzel bites should be deep golden brown but still yield slightly to gentle pressure. If your bites turn out too dense, check that your yeast was active and your water temperature wasn’t too hot during mixing.
Prevent sticking during the alkaline bath by working with well-oiled slotted spoons and having your baking sheets properly prepared with parchment and light oil coating. Move quickly but safely – the boiling baking soda solution is extremely hot and can cause serious burns if splashed.
Master the salt application by sprinkling immediately after removing from the alkaline bath while the surface is still wet – this helps the salt adhere properly. If salt won’t stick, lightly brush the surface with water before sprinkling.
Fix pale pretzel bites by ensuring your baking soda solution was at a full rolling boil and that you didn’t skip the alkaline bath step. For extra-dark color, add an additional tablespoon of baking soda to your solution.
Keep batches warm by covering finished pretzel bites with clean kitchen towels while you finish the remaining batches. If they cool too much before serving, warm them in a 300°F oven for 2-3 minutes to restore that perfect temperature and texture.
Variations & Flavor Customizations
Transform basic pretzel bites into gourmet creations with these delicious variations that maintain the perfect texture while adding exciting flavor profiles. Cinnamon sugar pretzel bites become dessert magic when you skip the salt and immediately roll hot bites in a mixture of ¼ cup sugar and 1 tablespoon cinnamon – the residual heat helps the coating adhere beautifully.
Everything bagel seasoning creates an irresistible savory option that’s perfect for brunch spreads or appetizer platters. Garlic parmesan pretzel bites get a sophisticated twist when you mix grated parmesan cheese with garlic powder and Italian herbs for sprinkling.
Sweet variations include rolling in powdered sugar while warm, drizzling with chocolate or caramel sauce after cooling, or even stuffing the dough with cream cheese before shaping for an indulgent surprise center.
Whole wheat versions work well by substituting half the bread flour with whole wheat flour, though you may need to add slightly more liquid to maintain proper dough consistency. Gluten-free adaptations require specialized flour blends designed for bread making, though texture will differ from traditional versions.
Stuffed pretzel bites can be filled with cheese cubes, pepperoni pieces, or even sweet fillings like jam or nutella – just ensure fillings are small enough not to burst through during baking.
Storage, Reheating & Make-Ahead Tips
Fresh pretzel bites taste best within 4-6 hours of baking when stored at room temperature in an airtight container or covered with clean kitchen towels. For longer storage up to 3 days, keep them in sealed containers, though they’ll lose some of their initial chewiness.
Reheating restores much of their original texture – wrap in damp paper towels and microwave for 10-15 seconds, or warm in a 300°F oven for 3-5 minutes until heated through. Never overheat, which makes them tough and chewy in an unpleasant way.
Freeze unbaked shaped pretzel bites on baking sheets, then transfer to freezer bags once solid. Bake directly from frozen by adding 2-3 extra minutes to the alkaline bath time and 3-5 extra minutes to baking time.
Make-ahead dough strategy works perfectly – prepare dough through the first rise, then refrigerate overnight. Bring to room temperature and proceed with shaping and baking the next day for fresh pretzel bites with minimal day-of effort.
Freeze fully baked pretzel bites for up to 3 months in airtight containers or freezer bags. Thaw at room temperature and refresh in a 300°F oven for 5 minutes to restore optimal texture and warmth.
Serving Suggestions & Dipping Sauces
Classic mustard remains the gold standard – try spicy brown mustard, honey mustard, or even beer cheese sauce for authentic pretzel shop experience. Warm cheese sauce made with sharp cheddar creates the ultimate comfort food combination that’s perfect for sharing.
Creative dipping options include ranch dressing, garlic aioli, spinach artichoke dip, or even pizza sauce for Italian-inspired pretzel bites. Sweet dips like chocolate sauce, caramel, cream cheese frosting, or maple butter transform pretzel bites into dessert territory.
Presentation ideas for entertaining include serving in lined baskets with multiple dipping sauces, creating pretzel bite sliders with deli meats and cheeses, or using them as croutons for hearty soups and salads.
Game day spreads benefit from offering both sweet and savory varieties alongside traditional bar snacks. Holiday adaptations can include seasonal dips like cranberry cream cheese or pumpkin spice butter that complement fall and winter gatherings.
Kids’ party presentations work well with fun, colorful dipping sauces served in small cups, allowing children to experiment with different flavor combinations while enjoying the hands-on eating experience.
Equipment Tips & Kitchen Setup
A stand mixer with dough hook makes the kneading process much easier and more consistent, though hand-kneading absolutely works with a bit more effort. A large, wide pot is essential for the alkaline bath – narrow pots make it difficult to manage multiple pretzel bites safely.
Slotted spoons or spider strainers help you move pretzel bites in and out of the boiling solution efficiently and safely. Parchment paper prevents sticking and makes cleanup much easier than trying to scrape baked-on pretzel residue from bare baking sheets.
Kitchen scales provide more accurate measurements than volume measurements, especially for flour, leading to more consistent results batch after batch. Instant-read thermometer helps ensure proper water temperature for yeast activation and dough rising conditions.
Wire cooling racks allow proper air circulation around finished pretzel bites, preventing soggy bottoms while maintaining the perfect texture balance between crispy exterior and soft interior.
Ready to fill your kitchen with the irresistible aroma of fresh-baked pretzel bites? This recipe brings all the satisfaction of your favorite pretzel shop right to your countertop, creating memories and delicious snacks that’ll have everyone asking when you’re making the next batch. Roll up your sleeves, gather the family, and prepare for the most rewarding baking adventure that delivers both process joy and incredible results!