Prep Time: 15 minutes | Cook Time: 15 minutes | Chill Time: 2 hours | Total Time: 2 hours 30 minutes | Serves: 6 | Difficulty: Medium
Table of Contents
The sweet aroma of caramelizing brown sugar still takes me back to Saturday afternoons in my grandmother’s kitchen, where she’d let me stir the bubbling pot while she carefully guided my small hands around the hot stove. Her homemade butterscotch pudding wasn’t just a dessert – it was pure magic in a bowl, with that perfect balance of sweet, buttery richness and silky smooth texture that no store-bought version could ever replicate. I remember standing on a wooden stool, mesmerized as she transformed simple ingredients into liquid gold, teaching me that patience and attention to detail were the secret ingredients to creating something truly extraordinary. Years later, when I finally mastered her technique, that first spoonful of my own butterscotch pudding brought tears to my eyes – it tasted exactly like childhood memories wrapped in creamy, nostalgic perfection. This isn’t just another pudding recipe; it’s a time-honored tradition that transforms your kitchen into a haven of comfort and creates desserts that become treasured family memories for generations to come.
Why You’ll Love This Easy Homemade Butterscotch Pudding
This isn’t your typical instant pudding from a box – this homemade butterscotch pudding delivers an incredibly rich, complex flavor that develops through traditional cooking methods that have delighted families for generations. The beauty of making butterscotch pudding from scratch lies in your complete control over every ingredient, ensuring no artificial flavors or preservatives find their way into this wholesome, family-friendly dessert that both kids and adults absolutely adore. Unlike store-bought versions that often taste overly sweet and artificial, this easy recipe creates deep, nuanced butterscotch flavor through proper caramelization techniques that develop genuine buttery notes and sophisticated sweetness. The luxurious, silky texture rivals expensive restaurant desserts while costing a fraction of the price, making it perfect for both everyday treats and special occasion entertaining. This versatile recipe scales beautifully for intimate dinners or large gatherings, and the impressive presentation makes guests think you’ve spent hours creating this elegant dessert when it actually requires just basic pantry ingredients and simple techniques that anyone can master.
Ingredient Insights & Selection for Perfect Butterscotch Flavor
The foundation of exceptional homemade butterscotch pudding starts with understanding how each ingredient contributes to the final flavor profile and selecting the highest quality components for optimal results. Dark brown sugar provides the signature butterscotch flavor through its molasses content, creating deeper, more complex sweetness than light brown sugar, though either can work depending on your preference for intensity. Real butter – not margarine – delivers the rich, creamy mouthfeel and authentic flavor that defines true butterscotch, so invest in high-quality unsalted butter for best results. Whole milk and heavy cream create the perfect balance of richness and smooth texture, while egg yolks act as natural emulsifiers that prevent separation and add luxurious body to the finished pudding. Pure vanilla extract enhances all the other flavors without overwhelming them, so choose real vanilla over imitation for noticeably better results. For those with dietary restrictions, coconut milk can substitute for dairy components, while maple syrup or coconut sugar can replace brown sugar for refined sugar-free versions. Fresh ingredients always produce superior results, so check expiration dates on dairy products and ensure eggs are fresh for optimal texture and food safety.
Key Techniques & Method Overview for Silky Perfection
Creating perfect homemade butterscotch pudding requires mastering four essential techniques that separate amateur attempts from professional-quality results that rival your favorite restaurant desserts. The first crucial technique involves proper caramelization of brown sugar and butter, where patience and temperature control prevent burning while developing deep, complex flavors that form the butterscotch base. Understanding tempering comes next – the process of gradually warming egg yolks with hot liquid to prevent scrambling while incorporating them smoothly into the pudding mixture. The third essential skill focuses on achieving proper thickening consistency through careful stirring and temperature management, ensuring the pudding coats the back of a spoon without becoming lumpy or curdled. Finally, proper straining and cooling techniques guarantee silky smooth texture while preventing skin formation on the surface during chilling. Temperature control throughout the entire process prevents common disasters like seized caramel, scrambled eggs, or grainy texture, while proper timing ensures each step builds upon the previous one to create pudding perfection. Visual and aromatic cues help you recognize when each stage is complete, developing confidence that leads to consistent success every time you make this beloved dessert.
Step-by-Step Instructions for Butterscotch Pudding
1. In a heavy-bottomed saucepan over medium heat, melt 4 tablespoons of unsalted butter until it begins to foam and releases a nutty aroma, swirling the pan occasionally to ensure even heating.
2. Add 3/4 cup packed dark brown sugar to the melted butter, whisking constantly until the mixture bubbles vigorously and becomes smooth and caramel-colored, approximately 2-3 minutes.
3. Slowly pour in 2 1/2 cups whole milk while whisking continuously to prevent the caramel from seizing. The mixture will bubble dramatically at first, then smooth out as you continue whisking.
4. In a separate bowl, whisk together 3 large egg yolks, 3 tablespoons cornstarch, and 1/4 teaspoon salt until completely smooth with no lumps visible.
5. Gradually ladle about 1/2 cup of the hot milk mixture into the egg yolk mixture, whisking constantly to temper the eggs and prevent scrambling. Continue adding hot liquid slowly until well combined.
6. Pour the tempered egg mixture back into the saucepan through a fine-mesh strainer, whisking constantly to combine everything smoothly.
7. Cook over medium-low heat, stirring constantly with a whisk or wooden spoon, for 3-5 minutes until the mixture thickens enough to coat the back of a spoon and registers 160°F on an instant-read thermometer.
8. Remove from heat and immediately stir in 2 teaspoons pure vanilla extract and 2 tablespoons heavy cream. The pudding should be smooth, glossy, and thick enough to hold its shape when spooned.
9. Press plastic wrap directly onto the surface of the pudding to prevent skin formation, then refrigerate for at least 2 hours until completely chilled and set.
Pro Tips & Troubleshooting for Guaranteed Success
The secret to restaurant-quality butterscotch pudding lies in these insider techniques that professional pastry chefs use to ensure perfect results every single time. Always use a heavy-bottomed saucepan to prevent hot spots that can cause the caramel to burn or the pudding to scorch during cooking. If your caramel seizes when adding milk, don’t panic – continue whisking vigorously over low heat until it smooths out completely. Control the cooking temperature carefully by adjusting heat as needed; the mixture should simmer gently rather than boil rapidly to prevent curdling or graininess. For ultra-smooth texture, strain the finished pudding through a fine-mesh sieve to remove any potential lumps before chilling. If your pudding seems too thick after chilling, whisk in a tablespoon of milk or cream to achieve desired consistency. Conversely, if it’s too thin, it likely wasn’t cooked long enough – return to low heat and cook while stirring until properly thickened. Always taste and adjust sweetness levels while the pudding is still warm, as flavors become more muted when chilled.
Variations & Customizations to Suit Every Taste
Transform this basic butterscotch pudding into exciting flavor combinations by incorporating complementary ingredients that enhance the butterscotch base without overwhelming its signature taste. For salted caramel butterscotch, add 1/2 teaspoon of sea salt during cooking for sophisticated flavor contrast that appeals to adult palates. Create a bourbon butterscotch version by stirring in 2 tablespoons of quality bourbon with the vanilla for grown-up dinner parties. Those following gluten-free diets can confidently enjoy this naturally gluten-free dessert, while dairy-free adaptations work beautifully using coconut milk and coconut cream substitutions. For chocolate lovers, fold in 2 ounces of chopped dark chocolate while the pudding is still warm, creating decadent butterscotch-chocolate swirls. Individual serving sizes work perfectly in ramekins or small glasses for elegant presentation, while larger batches can be made for family gatherings by doubling all ingredients and using a larger saucepan for proper heat distribution.
Storage, Reheating & Make-Ahead Tips
Properly stored homemade butterscotch pudding maintains its silky texture and rich flavor for up to five days in the refrigerator when covered with plastic wrap pressed directly against the surface. This dessert actually improves overnight as flavors meld and develop, making it an ideal make-ahead option for entertaining or busy weeknight treats. The pudding can be prepared up to three days in advance, making it perfect for dinner parties where you want to minimize last-minute preparation. While butterscotch pudding doesn’t require reheating and is best served chilled, you can gently warm individual portions in the microwave for 10-15 seconds if you prefer it slightly less cold. Avoid freezing this pudding as the texture becomes grainy and separated upon thawing, compromising the signature smooth consistency. For optimal presentation, remove from refrigerator 10-15 minutes before serving to allow flavors to brighten slightly and ensure the perfect eating temperature that showcases all the complex butterscotch notes.
Serving Suggestions & Perfect Pairings
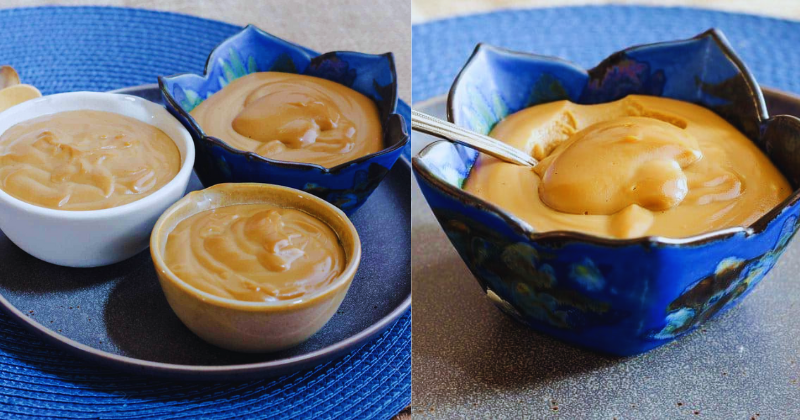
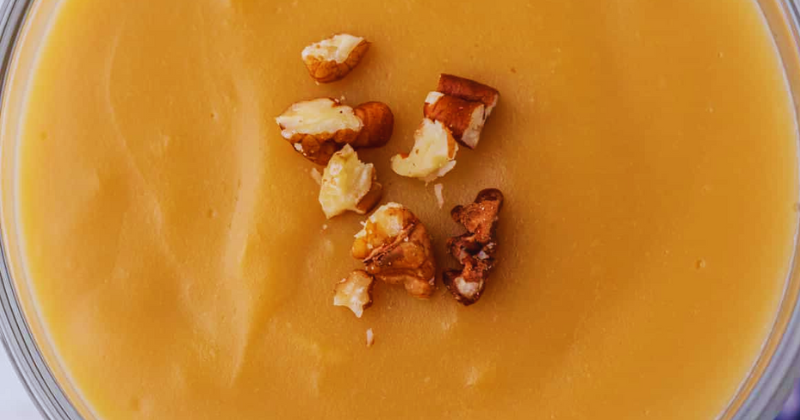
This elegant homemade butterscotch pudding shines as both a simple family dessert and a sophisticated finale to dinner parties that leaves lasting impressions on every guest. Serve in individual glasses or bowls topped with lightly sweetened whipped cream and a sprinkle of toasted pecans for classic presentation that never goes out of style. For special occasions, layer the pudding with crumbled gingersnap cookies and whipped cream in parfait glasses for stunning visual appeal. The rich, buttery flavors pair beautifully with fresh berries, particularly strawberries or raspberries, which provide bright acidity that cuts through the richness perfectly. Consider serving alongside crisp butter cookies or delicate shortbread for textural contrast, or drizzle with additional caramel sauce for ultimate indulgence. Coffee, tea, or dessert wines complement the butterscotch flavors wonderfully, while sparkling cider offers a refreshing non-alcoholic pairing. For holiday presentations, garnish with a cinnamon stick or star anise for aromatic visual appeal that matches the season’s festive spirit.
Ready to Create Your Own Butterscotch Magic?
This homemade butterscotch pudding recipe proves that the most memorable desserts come from simple ingredients transformed through time-honored techniques and a generous dose of patience. Have you ever made pudding from scratch before, or do you have childhood memories of stirring pots in someone’s kitchen? Share your butterscotch adventures and family dessert traditions in the comments below – I love hearing how classic recipes like this one continue to bring joy to new generations of home cooks!