Prep Time: 10 minutes | Cook Time: 15 minutes | Total Time: 25 minutes | Serves: 4-6 | Difficulty: Easy
Table of Contents
Picture this: It’s Tuesday night, the kids are hungry, and you’re staring into the fridge wondering how to transform basic pantry staples into something everyone will actually eat. That’s exactly where I found myself last month when I accidentally created what has become our family’s new obsession—cheesy sloppy joe toasts.
What started as a desperate attempt to use up leftover hamburger buns turned into pure genius. My youngest, who typically picks at her food, devoured two pieces before I could even sit down. My husband, usually skeptical of my “experimental” dinners, was already asking when I’d make them again. Sometimes the best recipes aren’t born from careful planning—they’re born from hungry families and creative problem-solving.
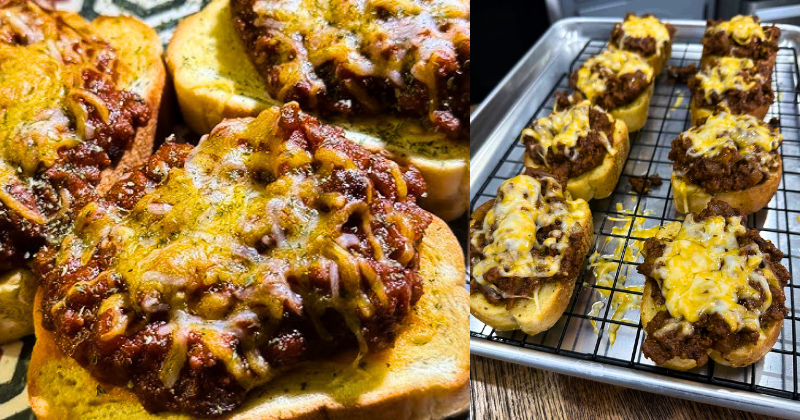
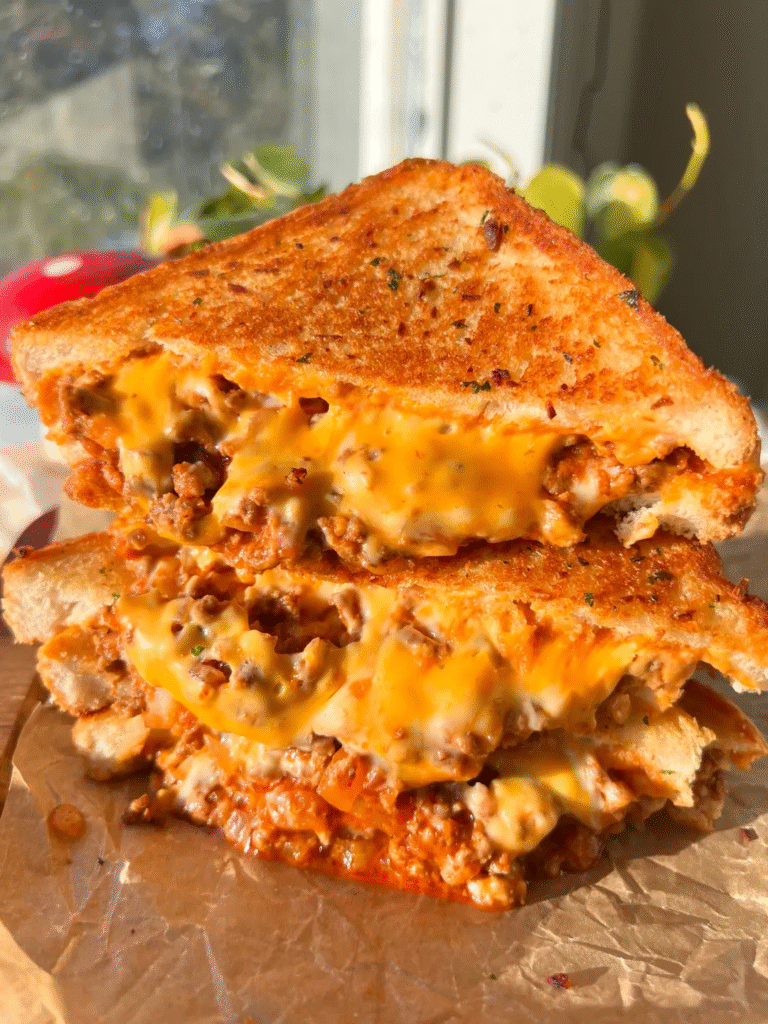
These cheesy sloppy joe toasts combine the nostalgic comfort of classic sloppy joes with the satisfying crunch of garlic bread, all topped with bubbling melted cheese. It’s comfort food that delivers on every level, and I can’t wait to share this game-changing recipe with you.
Why You’ll Love This Recipe
It’s ridiculously easy and beginner-friendly. Even if you’re new to cooking, this recipe sets you up for success. With just one skillet for the meat mixture and a few minutes under the broiler, you’ll have a restaurant-quality meal without any complicated techniques or specialty equipment.
Maximum flavor with minimal effort. The beauty of this dish lies in its simplicity. The savory, slightly sweet sloppy joe mixture gets an incredible depth of flavor from just a handful of pantry staples, while the toasted bread provides the perfect textural contrast that makes every bite interesting.
It’s incredibly budget-friendly. Ground beef, basic seasonings, and bread—you probably have most of these ingredients already. This recipe transforms affordable ingredients into something that feels special enough for weekend dinners but practical enough for busy weeknights.
Perfect for feeding a crowd. Whether you’re hosting a casual gathering or need to feed hungry teenagers, this recipe scales beautifully. The toasts are individually portioned, making them perfect for parties, game day, or family dinners where everyone wants something different.
Customizable to every taste preference. The base recipe is delicious as-is, but it’s also incredibly adaptable. Want it spicier? Add jalapeños. Prefer it milder? Skip the hot sauce. Need it gluten-free? Use your favorite gluten-free bread. This recipe works with your family’s preferences, not against them.
Ingredient Insights & Selection
Ground beef forms the heart of this recipe. I prefer using 80/20 ground beef for the perfect balance of flavor and texture. The slight fat content keeps the meat juicy without being greasy, and it provides enough richness to carry all our seasonings. If you prefer leaner options, 85/15 works beautifully too—just add a splash of olive oil to prevent sticking.
The bread choice makes a real difference. I’ve tested this recipe with everything from basic sandwich bread to artisan sourdough, and while all work, thick-cut bread holds up best to the juicy meat mixture. Texas toast, brioche, or even day-old French bread sliced thick create the ideal foundation. Avoid thin sandwich bread—it tends to get soggy too quickly.
Quality cheese elevates everything. While pre-shredded cheese is convenient, freshly grated cheese melts more smoothly and creates that perfect golden, bubbly top we’re after. Sharp cheddar provides the classic flavor, but don’t hesitate to experiment with Monterey Jack, Colby, or even a blend of your favorites.
Seasonings and pantry staples bring depth. Worcestershire sauce and tomato paste might seem like small additions, but they’re flavor powerhouses that transform ordinary ground beef into something extraordinary. Keep these pantry staples on hand—they’re the secret weapons that make simple recipes taste professional.
Key Techniques & Method Overview
Proper browning develops incredible flavor. The key to exceptional sloppy joe toasts starts with browning the ground beef correctly. Don’t overcrowd the pan, and resist the urge to stir too frequently. Let the meat develop a beautiful golden-brown crust in spots—this caramelization creates depth and richness that makes the difference between good and extraordinary.
Building the sauce requires patience. After browning the beef, we’re creating a simplified but flavorful sauce right in the same pan. The tomato paste gets cooked briefly to eliminate any raw taste, then we add our liquids gradually. This technique ensures everything combines smoothly without lumps or separation.
Toast preparation sets the foundation. While the meat mixture simmers, we’re preparing our bread for maximum success. A light brush of butter or olive oil ensures golden, crispy edges that won’t get soggy when topped with our meat mixture. The bread should be toasted just enough to hold its shape but not so much that it becomes hard.
Timing the cheese topping is crucial. The magic happens under the broiler, where the cheese melts and bubbles while the bread edges get perfectly crispy. This final step requires attention—broilers work quickly, and the difference between perfectly melted cheese and burnt disappointment is often just a minute or two.
Step-by-Step Instructions
- Preheat your broiler and prepare your workspace. Set your oven rack about 6 inches from the broiler element and preheat on high. Line a large baking sheet with foil for easy cleanup—you’ll thank yourself later.
- Brown the ground beef in a large skillet over medium-high heat. Break up the meat with a wooden spoon as it cooks, allowing it to develop golden-brown spots. This should take about 6-8 minutes. Don’t rush this step—the browning creates the foundation of flavor for your entire dish.
- Add aromatics and build the sauce. Push the browned beef to one side of the pan and add minced garlic and onion (if using) to the empty space. Cook until fragrant, about 1 minute, then stir everything together. Add tomato paste and cook for another minute until it darkens slightly.
- Create the sloppy joe mixture. Stir in ketchup, brown sugar, Worcestershire sauce, and a pinch of salt and pepper. Let the mixture simmer for 3-4 minutes until it thickens slightly. It should coat the back of a spoon but still be saucy enough to spread easily.
- Prepare the bread foundation. While the meat mixture simmers, lightly brush both sides of your bread slices with melted butter or olive oil. Arrange on your prepared baking sheet and toast under the broiler for 1-2 minutes per side until golden but not crispy.
- Assemble and finish. Divide the meat mixture evenly among the toasted bread slices, spreading it to the edges. Top each with a generous handful of shredded cheese. Broil for 2-3 minutes until the cheese is melted and bubbly with golden spots.
Pro Tips & Troubleshooting
Don’t skip the tomato paste step. Cooking the tomato paste for that extra minute eliminates any metallic taste and concentrates the flavor. If you skip this step, your sauce might taste flat or one-dimensional.
Watch the broiler like a hawk. Broilers vary significantly in intensity, and the line between perfectly melted cheese and burnt disaster is thin. Start checking after 1 minute and adjust timing based on your oven’s behavior.
Let the mixture rest before serving. Give your cheesy sloppy joe toasts 2-3 minutes to cool slightly before serving. This allows the flavors to settle and prevents the cheese from being molten hot while ensuring the bread maintains its structure.
Make extra meat mixture. The sloppy joe mixture keeps beautifully in the refrigerator for up to 4 days and freezes for up to 3 months. Having extra means you can whip up these toasts in minutes on busy nights.
Prevent soggy bread by controlling moisture. If your meat mixture seems too wet, simmer it uncovered for an extra few minutes to reduce the liquid. The mixture should be saucy but not runny to prevent the bread from becoming soggy.
Variations & Customizations
For spice lovers, add diced jalapeños with the onions or stir in a teaspoon of hot sauce with the other seasonings. A pinch of cayenne pepper also adds heat without overwhelming the dish.
Make it healthier by using ground turkey or chicken instead of beef, or try a plant-based ground meat alternative. You can also use whole grain bread for added fiber and nutrients.
Gluten-free adaptation is simple—just substitute your favorite gluten-free bread. Make sure it’s sturdy enough to hold the toppings without falling apart.
Different cheese combinations create entirely new flavor profiles. Try pepper jack for heat, Swiss for nuttiness, or a Mexican blend for a southwestern twist.
Storage, Reheating & Make-Ahead Tips
The meat mixture stores beautifully in the refrigerator for up to 4 days in an airtight container. For longer storage, freeze in portions for up to 3 months. Thaw overnight in the refrigerator before reheating.
Reheat gently to preserve texture and flavor. The microwave works for quick reheating, but a skillet over medium-low heat gives better results. Add a splash of water if the mixture seems dry.
Make-ahead strategy: Prepare the meat mixture up to 2 days in advance and store refrigerated. When ready to serve, simply reheat the mixture, toast the bread, and assemble. This makes weeknight dinners incredibly efficient.
Freezer-friendly portions make this recipe perfect for meal prep. Freeze the meat mixture in serving-sized portions, and you’ll always have a quick dinner option ready.
Serving Suggestions & Pairings
Classic accompaniments include crispy pickle spears, coleslaw, or a simple side salad. The acidity cuts through the richness of the cheese and meat mixture perfectly.
For heartier appetites, serve alongside roasted vegetables, sweet potato fries, or a warm soup. These toasts also work beautifully as an appetizer for parties when cut into smaller portions.
Beverage pairings can range from ice-cold beer or lemonade for casual meals to a light red wine for more sophisticated occasions. The key is balancing the richness of the dish with something refreshing.
Make it a complete meal by serving with fresh fruit, vegetables and dip, or a light pasta salad. The combination creates a satisfying dinner that feels both comforting and balanced.
These cheesy sloppy joe toasts have become our family’s go-to comfort food, and I have a feeling they’ll become yours too. There’s something magical about taking familiar flavors and presenting them in a completely new way—it’s like rediscovering an old favorite all over again. Give this recipe a try, and don’t be surprised if it becomes a regular in your dinner rotation!